Thursday, August 15, 2013

Thunderstorm Syrup


12oz raw honey
2T rapadura sugar
4T fresh lime juice
4T fresh finely grated ginger
1/2t sea salt

Cook slowly over med-low heat for 25 minutes. Don't let the sugars caramelize, just brew the ginger and let everything meld together. Strain through a fine mesh sieve, pressing the ginger threads to get all the goods.

The syrup alone is intensely gingery. It's a peppery hit in the mouth with a lingering spice, and surprisingly unsweet. Ice cream and cocktail experiments to follow...

Thursday, July 18, 2013

Blueberry Rhubarb Pie

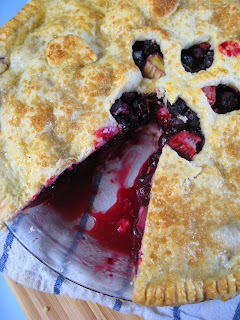
 Lauren picked up a flat of blueberries and some rhubarb the other day so I whipped up a pie for her!  My deal with my friends is that I will make them a fruit pie any time they want if they show up at my house with the fruit for it.  We all love the fresh seasonal produce from the farmers market, and we are getting to the best time of year for fruits. The original plan was to make just a straight blueberry pie, but we were a bit short on berries so we improvised.  
 Now, I've made quite a few fruit pies at this point but I've never made a blueberry pie.  The crust on this was perfect (as usual - I promise I will write you a post dedicated to pie crust next time I make one.  It is such a messy process I normally forget to take photos).  I did have a few complaints about the filling, but that is just my piefectionism showing through.
 
Here's the recipe for the filling I used:
- 4 C washed blueberries
- 2 C chopped rhubarb
- 3/4 C sugar
- 2 T tapioca
- zest of one large lemon
- juice of half the lemon

I heard that blueberries have a lot of pectin in them, so I went a bit lighter on the tapioca than my instincts told me to and regretted it.  As you can see from the last picture, the filling is oozing out of the pie more than I would like.  Flavor-wise this pie was incredible, the berries and the rhubarb went really well together.  See that juice in the pie tin up there?  I spent like 5 minutes sticking my fingers in it and licking them clean after I took that photo.  No joke.   All together though it was very tart.  I tend to add a lot less sugar to my fruit pies than the average recipe calls for.  Next time I will probably add an additional tablespoon of tapioca, and probably up the sugar to a whole cup instead of 3/4s.

Wednesday, July 17, 2013

Vanilla Testing & Butter Cookies

Today Karen over at the Sugarpill apothecary was giving out samples of a "mystery" vanilla extract.    She wanted a neutral taste test, so she withheld the details about this extract until after we had a chance to try it out.  The only info we got was that it is a high-end (read:expensive) extract with beans sourced from somewhere unusual.  Fascinating.
I decided to compare the mystery extract with the vanilla extract I use most often in my kitchen, Cook's Choice.  It's not the most expensive brand, but it is pretty well respected and good quality. 
 The color of the mystery vanilla extract is a bit more golden, and it seems slightly more transparent than the Cook's (but that may be differences in age, my bottle of Cook's has been around for a few months).   If clarity is any indication of quality, the mystery extract wins out there.  They smell very similar, but the mystery extract has a subtle citrus-y scent and seems to be a bit more floral.
 For a taste test, I diluted about half a dropper of each type in 1oz of milk.  Much like in the smell-test, the two tasted very similar with the mystery vanilla extract having a slightly more floral and crisp taste.  The differences are so subtle they are hard to describe, but I would call the mystery vanilla almost orange-blossom flavored.
For the sake of science I also compared them to this really cheap Kroger brand vanilla extract.  Compared to the two high quality extracts this one had basically no flavor.

I decided to test out the extract on a basic butter cookie recipe from King Arthur Flour's website.  As you may know, I love their site and use their recipes a lot.   The version on their site also has an icing recipe which I skipped this time around.  They also provide the ingredients list in ounces or grams (instead of by volume) if you prefer that method (I do). 

Here's the recipe:

  • 1 1/4 cups confectioners' sugar
  • 1 cup + 2 tablespoons unsalted butter, room temperature
  • 1 large egg yolk
  • 1 teaspoon salt
  • 2 teaspoons vanilla extract
  • 2 3/4 cups unbleached all-purpose flour

 
Butter and sugar - how so many good things start
  1. In a large bowl combine sugar, butter, egg yolk, salt and extract.  Beat together until smooth.
  2. Add the flour and beat together until it forms a cohesive and well blended cookie dough.  Scrape down the sides as necessary.  It will seem dry at first and then suddenly come together at the end. 
  3. Divide the dough in half, wrap in plastic and refrigerate until it firms up a bit (about half an hour at the minimum, up to 24 hours). 
  4. Once the dough is chilled, roll it out to about 1/8" - 3/16" thick and cut it into whatever shape you want or use cookie cutters.  Re-roll and cut the scraps too.
  5. Bake the cookies on an ungreased or parchment lined baking sheet at 350F for 10-20 minutes until the edges begin to brown but the cookie is still pale. The dough won't spread very much so you can fit quite a few on one sheet.
 These cookies are flaky and buttery.  They are very good plain, and I can also see them standing up to a sweet frosting very well.  As far as the vanilla flavor goes, I couldn't tell the difference between the mystery vanilla and my normal brand.   They say in baking many of the chemical compounds that make up natural vanilla extract get burned off and it is hard to distinguish the little notes that make the extract special.  I would save the extra fancy vanilla extract for low-heat uses.
After I took some of these cookies back over to Karen, she revealed to me more about the mystery vanilla.  It is from a company called Lagrima. It is made in Seattle from beans sourced from Uganda!  I would have to guess that the flavor differences come from the differences between the Ugandan bean and the more commonly used beans from Madagascar.  Also, probably differences between the small batch method vs. industrially produced vanilla.

Thursday, June 27, 2013

Butchery Video

This video is so amazing I wrote a fan letter to the artist:

Just wanted to tell you that your side butchery video is gorgeous, mesmerizing, and graciously full of humor. The fact that I can say all that about watching an animal being butchered is utterly surprising. Everyone should be so intimate with their food, but this is an important window for those of us (most of us) who aren't. Thanks for this!

Best,
Lauren


It's always great to be reminded that awesome shit is happening here, all the time. 

Friday, March 8, 2013

Potato Flour Cupcakes + No-dye Green Buttercream Frosting


I have totally fallen in love with this cake recipe.  It is great for people on grain-free and low-fat diets (just don't put the butter cream frosting on top if you want to avoid fat....yeah, that's all fat.).   This recipe would work perfectly for a more traditional sponge cake, a sponge roll, trifles, tiramisu...the list goes on.  It's so good.  I've been dying to find more uses for potato flour, especially since it is so close to St. Patrick's day!   The homemade butter cream frosting is tinted green with spinach.  It looks really beautiful - light green with darker green speckles - and you can't taste the spinach at all.


The recipe for the sponge cake comes from the website GrainFreeLiving.com.  The leavening for this cake comes primarily from the air that is beaten into the eggs, and partly from the baking soda. It should be noted that the potato flour sponge cake recipe is in metric measurements. 1 cup is 250ml which is slightly larger than the imperial 1 cup of an 8 oz measure.  


Ingredients:

4 eggs, separated
3/4 cup sugar
3/4 cup potato flour
1/4 cup arrowroot/tapioca flour
1/2 tsp baking soda
1 tsp cream of tarter
pinch salt

Directions:

Preheat the oven to 340F (170C) and get your cupcake tins or cake tins ready.  This recipe made 12 cupcakes for me, but I overfilled the tins a bit - it should probably be more like 14-16 cupcakes. It is vital to get the tins and oven ready beforehand because the chemical reaction of the leavening ingredients begins as soon as the batter is combined.  If you wait to long to get it into the oven the chemical reaction will be over and you won't end up with the right texture.

Separate the eggs and reserve the yolks in a small bowl, place the egg whites in a large mixing bowl.  Beat the egg whites until they are stiff.  I beat my eggs until they had soft peaks, but I think the recipe would have come out better if I had been a bit more patient.  Gradually add the sugar to the eggs until the mixture is creamy and thick, the beat in the egg yolks one by one.

Sift together the remaining dry ingredients (potato flour, arrowroot, baking soda, cream of tarter and salt).  Gently fold the dry ingredients into the beaten egg and sugar mix until fully incorporated, being careful not to over mix.

Gently scoop into the cupcake tin, filling about 2/3 of the tin.  (I overfilled mine. Whoops.)   Bake in the oven for 13-15 minutes.  If making a cake instead of cupcakes it should be 15-20 minutes.   When the cupcakes are done they will be starting to turn a light golden color, and a toothpick inserted in the center will come out clean.


Spinach Green Butter Cream Frosting

Ingredients:

1 cup spinach, steamed and drained
1/2 cup butter, softened
3 cups powdered sugar (about 1lb)
1 tsp. vanilla

Directions:

Steam and drain the spinach, then place it in a food processor and puree it until smooth.   Cream the butter and sugar together in a large bowl, add the vanilla and spinach and blend thoroughly.  If the mixture is to moist add more powdered sugar.  Should make enough to frost one large cake, or one batch of cupcakes.


Friday, March 1, 2013

Twice Baked Irish Flag Colcannon Potato

It's March!  That means our next holiday is St. Patrick's day!  St. Patrick's day was originally a Catholic feast day, but over the years it has become a secular celebration of Irish heritage and culture around the world.  It's estimated that the Irish diaspora (Irish immigrants to other countries and their descendants) "contains more than 100 million people, which is more than fifteen times the population of the island of Ireland itself, which had approximately 6.4 million in 2011."(Source)  In a survey conducted by the US Census Bureau in 2008, 11.9% of the total population of the United States claimed Irish ancestry.   It's estimated that the Irish diaspora population in the United States is 6 times the population of Ireland! 

My Mom comes from an Irish Catholic family and enjoys celebrating her Irish heritage once a year.   When I was a kid she would *always* make the Irish classic corned beef and cabbage on St. Patrick's day.   As a kid, I absolutely hated the smell of corned beef and cabbage cooking all day (especially the cabbage), though I loved eating corned beef.  Once I got older I started liking the cabbage too, and I've even made this traditional meal a few times myself since moving out.   But this time I wanted to make something a little different.  Something traditional but unexpected.  I wanted to take a classic Irish food and give it some zazz!

And this beautiful masterpiece, ladies and gentlemen, is what I came up with - the twice baked Irish flag.  This twice baked potato is stuffed with colcannon instead of plain mashed potato.  The green was added by liquefying some Kale and mixing it in.  The orange is sweet potato!   It is a little bit more work than a regular twice-baked potato, but it is totally worth it.  (Colcannon beats mashed potatoes ANY DAY.)

Twice Baked Irish Flag Potato - makes 4

Ingredients:
  • 3 large baking potatoes
  • 1 sweet potato (comparable size to the baking potatoes)
  • 2 shallots OR 1 leek OR 1/2 an onion (your choice, I used shallots.  If you use leeks, only use the white and light green parts)
  • 1 bunch of kale
  • 1-2 cloves of garlic
  • Milk and Butter for mashing (personal preference on how much you use, just don't make it soggy)
  • Olive oil (for cooking the shallots and kale)
Instructions:
  •  Bake the potatoes until they are soft and cooked through.  I rubbed some oil onto mine, wrapped them in tinfoil and stuck them in a 400F degree oven for about an hour.  However you normally bake potatoes will work. 
  • Slice the 3 baking potatoes in half.  Carefully scoop out the meat of the potato from the skins, leaving an 1/8th to a 1/4 of an inch of potato in the skin.  Reserve the 4 nicest looking halfs and discard the other 2 skins (scrape out the rest of the potato from them).  You can also discard the skin from the sweet potato. 
  • Add your preferred amount of milk and butter to the potatoes and mash them up good!(This is also a good time to add salt and pepper if you are into that)
  • Chop your shallots (leeks or onions) and garlic.  Destem your kale and tear it into bite-sized pieces.   Set aside a few pieces of uncooked kale to use to make the green color. Cook the shallots in a pan with a small amount of butter or oil until they become translucent, then add the garlic and kale and saute until the kale is fully wilted.  
  • Add 2/3 of the kale mixture to the mashed potatoes, and 1/3 to the sweet potato.  Once mixed in, divide the mashed potatoes into two bowls.   To make the green dye place the raw kale you set aside in a food processor or mortar and pestle and process until it begins to liquefy.  Add the kale juice to one of the bowls of colcannon and stir in until it becomes uniformly green.  
  • Scoop the colcannon mixtures back into the waiting potato skins in order of color - green, white, orange - and stick back in the oven at 350F until it is warmed through.  Turn on the broiler for a few minutes at the end to brown the top.   Serve with Irish cheddar grated over the top.
 These are very easily reheated by just sticking them in the oven again!

Wednesday, February 27, 2013

Fried Chicken Liver

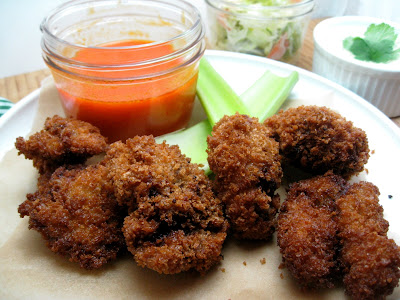
Sometimes I ask my friends to do ridiculous things, and bless them, they go for it.   So the other night I turn to my friend Jon and I ask him to make me fried chicken livers, but to make them pretty.  I'm sure the other food photographers out there on the internet are laughing right about now.  You see, fried food isn't pretty.  It's delicious, crunch, savory - yes.  Beautiful? Generally, no.  But Jon is a wizard of frying things, and totally delivered on the promise of some lovely fried chicken livers.


They don't get any more photogenic than that folks! Seriously! Look it up!

There are few things better for me than standing in the kitchen while Jon fries things and Lauren makes sauces.  I am perfectly capable of frying and sauce making - but those are skills that Jon and Lauren respectively own.  I can't even compete, and I don't even want to.  Sure, I never really learned the trick to frying.  And even though I know how to make Lauren's Kale Caesar salad, I never do it myself if she is around!   I have my skills though - you won't see Lauren or Jon baking any bread or making pies.   I am our groups resident baker.  I feel sorry for people who have friends that don't cook, because I absolutely love the division of labor we've got going on here.   We can all feed ourselves perfectly well, but the quality of the food we make together is exponentially better.  And isn't that what family and friends are for?
This was mutually our first attempt at preparing fried liver.  As it turns out, liver is pretty simple to prepare.   People tend to shy away from eating organ meats and liver.  They think of liver as the body's toxins filter and assume that the liver must be full of stuff they shouldn't eat.  While it's true that you should only consume liver from organically raised animals (otherwise you probably will be consuming a bunch of antibiotics and chemicals), the liver does more than just filter out toxins.  It has too many jobs in the body for me to list them all, but one of its tasks, apart from being a filter, is to store and assimilate fat soluble vitamins like A, E, D and K.  It's also chock full of vitamin B-12, folate, riboflavin, selenium, niacin, iron, and phosphorus just to name a few.   Nutritionally, the downside to eating liver is that it is very high in cholesterol. 

For our adventure we approximately followed this recipe from one of my favorite sites on the web Serious Eats (though we mostly just let Jon do his thing.  He is the Fry Master).  Here are a few things we took away from the process:
  • Pretty much every recipe out there will tell you to soak liver in buttermilk, lemon juice or vinegar.  Letting the liver soak in something slightly acidic takes away the bitter flavor of liver.   That bitter flavor is stronger in livers from lager animals like cows.  Because chicken livers have a milder flavor, this step isn't vital.  We saw recipes that called for soak times of up to 12 hours, and think this is probably more appropriate for those larger, more strongly flavored livers.  We soaked our chicken livers in a buttermilk/hot sauce mixture for about an hour and a half and they were awesome. 
  • Batter all the liver before you start frying.  Some fried foods need to hit the oil immediately after being breaded, so you have to bread as you go.  The liver held onto the Panko crumb really well, and according to Jon, it was a total pain in the ass to try to batter it mid-fry.  Learn from our hardship.

We ate ours like buffalo wings - with Crystal hot sauce and coleslaw on the side.  Lauren whipped up a batch of homemade mayo and she divided to make a garlic/cilantro/ranch flavored dipping sauce and a coleslaw dressing.   My mouth is watering just thinking about it.   

(I just realized this post makes it sound like I stood in the kitchen and did nothing!  I did the prep work of trimming the livers and preparing the coleslaw.  It really was a group effort!)

LinkWithin

Related Posts Plugin for WordPress, Blogger...