Thursday, August 15, 2013

Thunderstorm Syrup


12oz raw honey
2T rapadura sugar
4T fresh lime juice
4T fresh finely grated ginger
1/2t sea salt

Cook slowly over med-low heat for 25 minutes. Don't let the sugars caramelize, just brew the ginger and let everything meld together. Strain through a fine mesh sieve, pressing the ginger threads to get all the goods.

The syrup alone is intensely gingery. It's a peppery hit in the mouth with a lingering spice, and surprisingly unsweet. Ice cream and cocktail experiments to follow...

Thursday, July 18, 2013

Blueberry Rhubarb Pie

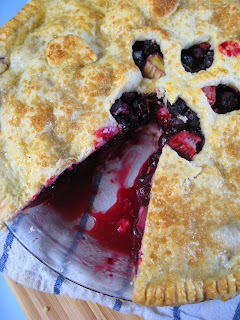
 Lauren picked up a flat of blueberries and some rhubarb the other day so I whipped up a pie for her!  My deal with my friends is that I will make them a fruit pie any time they want if they show up at my house with the fruit for it.  We all love the fresh seasonal produce from the farmers market, and we are getting to the best time of year for fruits. The original plan was to make just a straight blueberry pie, but we were a bit short on berries so we improvised.  
 Now, I've made quite a few fruit pies at this point but I've never made a blueberry pie.  The crust on this was perfect (as usual - I promise I will write you a post dedicated to pie crust next time I make one.  It is such a messy process I normally forget to take photos).  I did have a few complaints about the filling, but that is just my piefectionism showing through.
 
Here's the recipe for the filling I used:
- 4 C washed blueberries
- 2 C chopped rhubarb
- 3/4 C sugar
- 2 T tapioca
- zest of one large lemon
- juice of half the lemon

I heard that blueberries have a lot of pectin in them, so I went a bit lighter on the tapioca than my instincts told me to and regretted it.  As you can see from the last picture, the filling is oozing out of the pie more than I would like.  Flavor-wise this pie was incredible, the berries and the rhubarb went really well together.  See that juice in the pie tin up there?  I spent like 5 minutes sticking my fingers in it and licking them clean after I took that photo.  No joke.   All together though it was very tart.  I tend to add a lot less sugar to my fruit pies than the average recipe calls for.  Next time I will probably add an additional tablespoon of tapioca, and probably up the sugar to a whole cup instead of 3/4s.

Wednesday, July 17, 2013

Vanilla Testing & Butter Cookies

Today Karen over at the Sugarpill apothecary was giving out samples of a "mystery" vanilla extract.    She wanted a neutral taste test, so she withheld the details about this extract until after we had a chance to try it out.  The only info we got was that it is a high-end (read:expensive) extract with beans sourced from somewhere unusual.  Fascinating.
I decided to compare the mystery extract with the vanilla extract I use most often in my kitchen, Cook's Choice.  It's not the most expensive brand, but it is pretty well respected and good quality. 
 The color of the mystery vanilla extract is a bit more golden, and it seems slightly more transparent than the Cook's (but that may be differences in age, my bottle of Cook's has been around for a few months).   If clarity is any indication of quality, the mystery extract wins out there.  They smell very similar, but the mystery extract has a subtle citrus-y scent and seems to be a bit more floral.
 For a taste test, I diluted about half a dropper of each type in 1oz of milk.  Much like in the smell-test, the two tasted very similar with the mystery vanilla extract having a slightly more floral and crisp taste.  The differences are so subtle they are hard to describe, but I would call the mystery vanilla almost orange-blossom flavored.
For the sake of science I also compared them to this really cheap Kroger brand vanilla extract.  Compared to the two high quality extracts this one had basically no flavor.

I decided to test out the extract on a basic butter cookie recipe from King Arthur Flour's website.  As you may know, I love their site and use their recipes a lot.   The version on their site also has an icing recipe which I skipped this time around.  They also provide the ingredients list in ounces or grams (instead of by volume) if you prefer that method (I do). 

Here's the recipe:

  • 1 1/4 cups confectioners' sugar
  • 1 cup + 2 tablespoons unsalted butter, room temperature
  • 1 large egg yolk
  • 1 teaspoon salt
  • 2 teaspoons vanilla extract
  • 2 3/4 cups unbleached all-purpose flour

 
Butter and sugar - how so many good things start
  1. In a large bowl combine sugar, butter, egg yolk, salt and extract.  Beat together until smooth.
  2. Add the flour and beat together until it forms a cohesive and well blended cookie dough.  Scrape down the sides as necessary.  It will seem dry at first and then suddenly come together at the end. 
  3. Divide the dough in half, wrap in plastic and refrigerate until it firms up a bit (about half an hour at the minimum, up to 24 hours). 
  4. Once the dough is chilled, roll it out to about 1/8" - 3/16" thick and cut it into whatever shape you want or use cookie cutters.  Re-roll and cut the scraps too.
  5. Bake the cookies on an ungreased or parchment lined baking sheet at 350F for 10-20 minutes until the edges begin to brown but the cookie is still pale. The dough won't spread very much so you can fit quite a few on one sheet.
 These cookies are flaky and buttery.  They are very good plain, and I can also see them standing up to a sweet frosting very well.  As far as the vanilla flavor goes, I couldn't tell the difference between the mystery vanilla and my normal brand.   They say in baking many of the chemical compounds that make up natural vanilla extract get burned off and it is hard to distinguish the little notes that make the extract special.  I would save the extra fancy vanilla extract for low-heat uses.
After I took some of these cookies back over to Karen, she revealed to me more about the mystery vanilla.  It is from a company called Lagrima. It is made in Seattle from beans sourced from Uganda!  I would have to guess that the flavor differences come from the differences between the Ugandan bean and the more commonly used beans from Madagascar.  Also, probably differences between the small batch method vs. industrially produced vanilla.

Thursday, June 27, 2013

Butchery Video

This video is so amazing I wrote a fan letter to the artist:

Just wanted to tell you that your side butchery video is gorgeous, mesmerizing, and graciously full of humor. The fact that I can say all that about watching an animal being butchered is utterly surprising. Everyone should be so intimate with their food, but this is an important window for those of us (most of us) who aren't. Thanks for this!

Best,
Lauren


It's always great to be reminded that awesome shit is happening here, all the time. 

Friday, March 8, 2013

Potato Flour Cupcakes + No-dye Green Buttercream Frosting


I have totally fallen in love with this cake recipe.  It is great for people on grain-free and low-fat diets (just don't put the butter cream frosting on top if you want to avoid fat....yeah, that's all fat.).   This recipe would work perfectly for a more traditional sponge cake, a sponge roll, trifles, tiramisu...the list goes on.  It's so good.  I've been dying to find more uses for potato flour, especially since it is so close to St. Patrick's day!   The homemade butter cream frosting is tinted green with spinach.  It looks really beautiful - light green with darker green speckles - and you can't taste the spinach at all.


The recipe for the sponge cake comes from the website GrainFreeLiving.com.  The leavening for this cake comes primarily from the air that is beaten into the eggs, and partly from the baking soda. It should be noted that the potato flour sponge cake recipe is in metric measurements. 1 cup is 250ml which is slightly larger than the imperial 1 cup of an 8 oz measure.  


Ingredients:

4 eggs, separated
3/4 cup sugar
3/4 cup potato flour
1/4 cup arrowroot/tapioca flour
1/2 tsp baking soda
1 tsp cream of tarter
pinch salt

Directions:

Preheat the oven to 340F (170C) and get your cupcake tins or cake tins ready.  This recipe made 12 cupcakes for me, but I overfilled the tins a bit - it should probably be more like 14-16 cupcakes. It is vital to get the tins and oven ready beforehand because the chemical reaction of the leavening ingredients begins as soon as the batter is combined.  If you wait to long to get it into the oven the chemical reaction will be over and you won't end up with the right texture.

Separate the eggs and reserve the yolks in a small bowl, place the egg whites in a large mixing bowl.  Beat the egg whites until they are stiff.  I beat my eggs until they had soft peaks, but I think the recipe would have come out better if I had been a bit more patient.  Gradually add the sugar to the eggs until the mixture is creamy and thick, the beat in the egg yolks one by one.

Sift together the remaining dry ingredients (potato flour, arrowroot, baking soda, cream of tarter and salt).  Gently fold the dry ingredients into the beaten egg and sugar mix until fully incorporated, being careful not to over mix.

Gently scoop into the cupcake tin, filling about 2/3 of the tin.  (I overfilled mine. Whoops.)   Bake in the oven for 13-15 minutes.  If making a cake instead of cupcakes it should be 15-20 minutes.   When the cupcakes are done they will be starting to turn a light golden color, and a toothpick inserted in the center will come out clean.


Spinach Green Butter Cream Frosting

Ingredients:

1 cup spinach, steamed and drained
1/2 cup butter, softened
3 cups powdered sugar (about 1lb)
1 tsp. vanilla

Directions:

Steam and drain the spinach, then place it in a food processor and puree it until smooth.   Cream the butter and sugar together in a large bowl, add the vanilla and spinach and blend thoroughly.  If the mixture is to moist add more powdered sugar.  Should make enough to frost one large cake, or one batch of cupcakes.


Friday, March 1, 2013

Twice Baked Irish Flag Colcannon Potato

It's March!  That means our next holiday is St. Patrick's day!  St. Patrick's day was originally a Catholic feast day, but over the years it has become a secular celebration of Irish heritage and culture around the world.  It's estimated that the Irish diaspora (Irish immigrants to other countries and their descendants) "contains more than 100 million people, which is more than fifteen times the population of the island of Ireland itself, which had approximately 6.4 million in 2011."(Source)  In a survey conducted by the US Census Bureau in 2008, 11.9% of the total population of the United States claimed Irish ancestry.   It's estimated that the Irish diaspora population in the United States is 6 times the population of Ireland! 

My Mom comes from an Irish Catholic family and enjoys celebrating her Irish heritage once a year.   When I was a kid she would *always* make the Irish classic corned beef and cabbage on St. Patrick's day.   As a kid, I absolutely hated the smell of corned beef and cabbage cooking all day (especially the cabbage), though I loved eating corned beef.  Once I got older I started liking the cabbage too, and I've even made this traditional meal a few times myself since moving out.   But this time I wanted to make something a little different.  Something traditional but unexpected.  I wanted to take a classic Irish food and give it some zazz!

And this beautiful masterpiece, ladies and gentlemen, is what I came up with - the twice baked Irish flag.  This twice baked potato is stuffed with colcannon instead of plain mashed potato.  The green was added by liquefying some Kale and mixing it in.  The orange is sweet potato!   It is a little bit more work than a regular twice-baked potato, but it is totally worth it.  (Colcannon beats mashed potatoes ANY DAY.)

Twice Baked Irish Flag Potato - makes 4

Ingredients:
  • 3 large baking potatoes
  • 1 sweet potato (comparable size to the baking potatoes)
  • 2 shallots OR 1 leek OR 1/2 an onion (your choice, I used shallots.  If you use leeks, only use the white and light green parts)
  • 1 bunch of kale
  • 1-2 cloves of garlic
  • Milk and Butter for mashing (personal preference on how much you use, just don't make it soggy)
  • Olive oil (for cooking the shallots and kale)
Instructions:
  •  Bake the potatoes until they are soft and cooked through.  I rubbed some oil onto mine, wrapped them in tinfoil and stuck them in a 400F degree oven for about an hour.  However you normally bake potatoes will work. 
  • Slice the 3 baking potatoes in half.  Carefully scoop out the meat of the potato from the skins, leaving an 1/8th to a 1/4 of an inch of potato in the skin.  Reserve the 4 nicest looking halfs and discard the other 2 skins (scrape out the rest of the potato from them).  You can also discard the skin from the sweet potato. 
  • Add your preferred amount of milk and butter to the potatoes and mash them up good!(This is also a good time to add salt and pepper if you are into that)
  • Chop your shallots (leeks or onions) and garlic.  Destem your kale and tear it into bite-sized pieces.   Set aside a few pieces of uncooked kale to use to make the green color. Cook the shallots in a pan with a small amount of butter or oil until they become translucent, then add the garlic and kale and saute until the kale is fully wilted.  
  • Add 2/3 of the kale mixture to the mashed potatoes, and 1/3 to the sweet potato.  Once mixed in, divide the mashed potatoes into two bowls.   To make the green dye place the raw kale you set aside in a food processor or mortar and pestle and process until it begins to liquefy.  Add the kale juice to one of the bowls of colcannon and stir in until it becomes uniformly green.  
  • Scoop the colcannon mixtures back into the waiting potato skins in order of color - green, white, orange - and stick back in the oven at 350F until it is warmed through.  Turn on the broiler for a few minutes at the end to brown the top.   Serve with Irish cheddar grated over the top.
 These are very easily reheated by just sticking them in the oven again!

Wednesday, February 27, 2013

Fried Chicken Liver

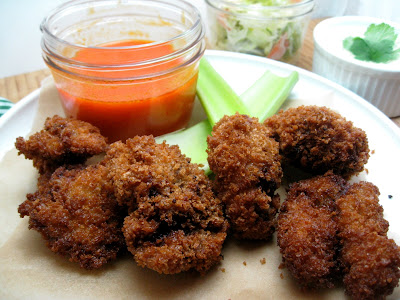
Sometimes I ask my friends to do ridiculous things, and bless them, they go for it.   So the other night I turn to my friend Jon and I ask him to make me fried chicken livers, but to make them pretty.  I'm sure the other food photographers out there on the internet are laughing right about now.  You see, fried food isn't pretty.  It's delicious, crunch, savory - yes.  Beautiful? Generally, no.  But Jon is a wizard of frying things, and totally delivered on the promise of some lovely fried chicken livers.


They don't get any more photogenic than that folks! Seriously! Look it up!

There are few things better for me than standing in the kitchen while Jon fries things and Lauren makes sauces.  I am perfectly capable of frying and sauce making - but those are skills that Jon and Lauren respectively own.  I can't even compete, and I don't even want to.  Sure, I never really learned the trick to frying.  And even though I know how to make Lauren's Kale Caesar salad, I never do it myself if she is around!   I have my skills though - you won't see Lauren or Jon baking any bread or making pies.   I am our groups resident baker.  I feel sorry for people who have friends that don't cook, because I absolutely love the division of labor we've got going on here.   We can all feed ourselves perfectly well, but the quality of the food we make together is exponentially better.  And isn't that what family and friends are for?
This was mutually our first attempt at preparing fried liver.  As it turns out, liver is pretty simple to prepare.   People tend to shy away from eating organ meats and liver.  They think of liver as the body's toxins filter and assume that the liver must be full of stuff they shouldn't eat.  While it's true that you should only consume liver from organically raised animals (otherwise you probably will be consuming a bunch of antibiotics and chemicals), the liver does more than just filter out toxins.  It has too many jobs in the body for me to list them all, but one of its tasks, apart from being a filter, is to store and assimilate fat soluble vitamins like A, E, D and K.  It's also chock full of vitamin B-12, folate, riboflavin, selenium, niacin, iron, and phosphorus just to name a few.   Nutritionally, the downside to eating liver is that it is very high in cholesterol. 

For our adventure we approximately followed this recipe from one of my favorite sites on the web Serious Eats (though we mostly just let Jon do his thing.  He is the Fry Master).  Here are a few things we took away from the process:
  • Pretty much every recipe out there will tell you to soak liver in buttermilk, lemon juice or vinegar.  Letting the liver soak in something slightly acidic takes away the bitter flavor of liver.   That bitter flavor is stronger in livers from lager animals like cows.  Because chicken livers have a milder flavor, this step isn't vital.  We saw recipes that called for soak times of up to 12 hours, and think this is probably more appropriate for those larger, more strongly flavored livers.  We soaked our chicken livers in a buttermilk/hot sauce mixture for about an hour and a half and they were awesome. 
  • Batter all the liver before you start frying.  Some fried foods need to hit the oil immediately after being breaded, so you have to bread as you go.  The liver held onto the Panko crumb really well, and according to Jon, it was a total pain in the ass to try to batter it mid-fry.  Learn from our hardship.

We ate ours like buffalo wings - with Crystal hot sauce and coleslaw on the side.  Lauren whipped up a batch of homemade mayo and she divided to make a garlic/cilantro/ranch flavored dipping sauce and a coleslaw dressing.   My mouth is watering just thinking about it.   

(I just realized this post makes it sound like I stood in the kitchen and did nothing!  I did the prep work of trimming the livers and preparing the coleslaw.  It really was a group effort!)

Monday, February 25, 2013

All About Eggs

Not sure if you should get the organic cage-free eggs, or the free-range omega-3 eggs, or the vegetarian brown eggs?   Do you need jumbo eggs or will medium eggs work?  All the labels on eggs in the store can be hard to decipher, here's what you need to know before you buy eggs.

Packing Dates 

Freshness of the eggs is one of the most important factors when it comes to the quality and nutrient content.   Eggs inspected and graded by the USDA will have a three digit number representing the date they were washed and packed stamped on the carton. The Cook-It-Quick food safety website says "The number is a three-digit code that represents the consecutive day of the year (the "Julian Date") starting with January 1 as 001 and ending with December 31 as 365. When a "sell-by" date appears on a carton bearing the USDA grade shield, the code date may not exceed 45 days from the date of pack."

Egg Sizes

The USDA grades egg size by weight, calculated by the minimum acceptable weight per dozen.  Sizes of the eggs may vary but the weight should be consistent.  Most recipes call for large egg which are at least 24oz per dozen or about 2oz per large egg. Here's a handy chart made by the American Egg Board: 
http://www.aeb.org/images/website/images/foodservice-professionals/egg-products/egg-sizes.jpg

Egg Grades

http://www.fsis.usda.gov/FACTSheets/Focus_On_Shell_Eggs/index.asp#16Egg grades reflect the quality of the eggs as determined by USDA standards and inspection.  There are three grades of eggs - AA, A and B, with AA being the highest quality.  The quality is determined by inspecting both the shell and the interior of the egg for defects such as discoloration, cracks, and irregularities. The USDA website says US grade AA eggs "have whites that are thick and firm; yolks that are high, round, and practically free from defects; and clean, unbroken shells."  Grade A eggs are different from AA eggs in one way, instead of "thick and firm" whites they have "reasonably firm" whites.  Grade A eggs are what is most often sold in stores.  Grade B eggs are typically not sold in stores, but are used to make egg products.  If you do find Grade B eggs being sold, they are fine for general cooking and baking, but not ideal for poaching or other uses where the visual of the egg is important.

Egg Colors 

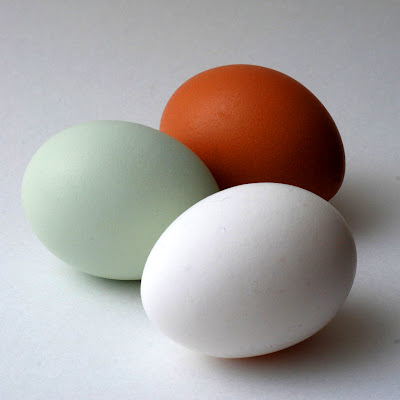
There's no nutritional difference between different color eggs.  The coloring is determined by the breed of the chicken - white eggs are laid by white chickens, brown eggs are laid by red chickens, and blue eggs are laid by a special South American breed of chicken called the Arucana. Brown eggs generally cost more because the chickens that lay them eat more.  Blue eggs are not available in most places in the U.S.A.
http://en.wikipedia.org/wiki/File:AraucanaEgg_vs_Brown_White.jpg
 Yolk color can vary depending on the feed of the hen.  Organic pigments called carotenoids determine the color of the yolk, the main two yellow carotenoids in eggs being lutein and zeaxanthin.  There are also carotenoids in eggs that have a orange or red color.  Eggs sold in US stores will pretty much always be golden yellow, but don't be freaked out if they are darker.  This chart won't affect how you buy eggs, I'm just a nerd who loves charts.
http://www.christa.bg/files/Catalogue/105.pdf
 The egg white will be slightly more opaque and thicker when the egg is fresh.  As the egg ages the carbon dioxide dissipates and the white will become more clear and watery. 

Cage

Most eggs are produced by chickens in cages.  Caging has many benefits for the producers - automation reduces the amount of physical labor, workers are exposed to less dust and ammonia, minimized contact between the hen and their feces and the eggs and the hen significantly reduces the chance of bacterial infection of the eggs, and it increases production.  Unfortunately, caging has many negative side effects for the hens - not being able to move around and engage in normal chicken behavior causes diseases of the body and behavioral problems in the chickens, to the extent that many caged chickens have the tips of their beaks cut off, so they don't attack each other through the cages.  Cage eggs are the cheapest, but many people have ethical problems with their production so there is a growing market for eggs from chickens raised in less factory like settings.

Cage Free/Barn Laid

A cage-free egg is from a chicken that was raised indoors, but was allowed to roam around within an enclosed space.   Hens are protected from predation and inclement weather, and still can engage in normal chicken behavior and socialization.   There is a slightly higher chance of infection because the chicken feed can come in contact with their feces.  Cage-free hens are able to walk, spread their wings and lay their eggs in nests, natural behaviors that caged hens cannot engage in.  However, cage-free does not necessarily mean cruelty free.  Many cage-free hens are raised in flocks of thousands, never go outside, and like the hens in cages, some producers clip their beaks and, although most producers no longer support the practice, some still use starvation to force molt their birds. Cage-free is terminology designed to quell consumers concerns - it sounds better than "high-density floor confinement" which is the industry term for it.

Free-Range

In the United States, eggs marked as "free-range" can be slightly misleading.  When most people imagine a free-range chicken roaming around the yard hunting and pecking, what they are actually imagining is a different farming practice called "yarding".  While "free-range" has a legal standard for meat production, there are no guidelines for free-range eggs.   All that is required for an egg to be marketed as free-range is for the chickens to have access to an outdoor range.  There is no standard for how large the range is, or how much pasture the chickens get, or how much time outside they spend.  Many free-range chickens are provided a small, fenced in, gravel covered area immediately outside the barn door, and are kept indoors for a significant part of their lives.  Over time the ground the chickens have access to becomes polluted and acidic from a build up of chicken waste, causing damage to the local ecology.

Pasture-Raised

Because of the ambiguity of the term "free-range" farmer Joel Salatin has reintroduced the term and technique of pasture-raising chickens at his family farm in Virginia, the Polyface.  Pasture-raised birds remain outside on pasture at all times, confined to a portable pen and given a covered area to protect them from the weather.  When waste begins to build up, the chickens are moved to another part of the pasture.  The Polyface farm has been praised for being humane and ecologically sound, and the practice has spread to other sustainable farmers.  There is some evidence that pasture-raised hens produce superior, more healthful eggs than factory hens.  According to tests, pasture raised chicken eggs may have 1/3 less cholesterol, 1/4 less saturated fat, 2/3 more vitamin A, 2 times more omega-3 fatty acids, 3 times more vitamin E and 7 times more beta-carotene than what is considered the normal nutritional content of an egg as determined by the USDA.  This is probably due to having a more varied diet consisting of more natural, foraged foods such as green grasses and insects. 

Pasteurized 

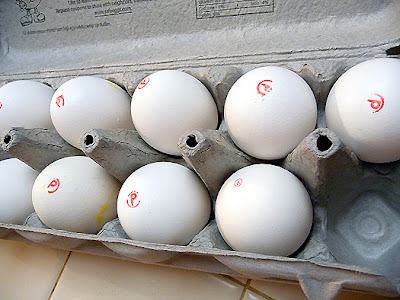
Pasteurization is the process of killing dangerous microorganisms in food by applying controlled heat for a short time.  Until recently, heating egg to the temperature required for pasteurization would cook the egg.  In the 1990s the process for pasteurizing eggs in shell was developed and patented, and currently National Pasteurized Eggs Inc. is the exclusive provider of pasteurized eggs in the USA.  The process can be duplicated at home by use of a temperature controlled water bath.  Pasteurized eggs are recommended for applications where the egg won't be cooked, for example in mayonnaise.  In fact, the USDA won't allow sale of any food products with unpasteurized raw eggs.  Pasteurized eggs are sold clearly marked with a red "P" stamp.
http://www.flickr.com/photos/browneyedbaker/3834368246/

Fertilized vs. Unfertilized 

The only real difference between a fertilized and unfertilized egg is that a rooster has been involved.  Hens will lay eggs whether they have mated or not, and the vast majority of eggs sold are unfertilized.   Most hens at commercial farms are never around roosters.  Fertilized eggs are more likely to come from a free-range farm.  All eggs sold as food within the United States must be refrigerated, and the refrigeration halts any embryonic growth within the egg.  Some people claim there are additional health benefits to eating fertilized eggs, but nutritional studies have found no discernible difference.  Eggs sold in the US go through a process called candling in which a light is shown through the shell, revealing imperfections in interior - this process screens out defective eggs and highlights irregularities, so you don't have to worry about cracking open an egg and finding a half formed chicken inside.  Eggs are normally harvested and refrigerated within a few hours of being laid, and it takes about 21 days for a chicken egg to fully develop and hatch.
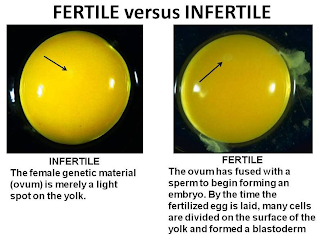
http://www.ca.uky.edu/smallflocks/faq.html

Nutrient Enhanced 

There are many specialty eggs on the market that are nutrient enhanced, the more common types being low cholesterol eggs, eggs enriched with omega-3s and eggs enriched with lutein.  All of these changes to the eggs nutritional content are effected by changing the feed of the chicken.   Chickens producing "low cholesterol" eggs are fed an all-vegetarian diet high in protein, fiber and vitamin E.   Chickens producing omega-3 enhanced eggs are fed diets rich in omega fatty acids like flax seeds, insects, greens, and fish oil.   There is controversy as to whether these more expensive eggs are worth the price tag.  Neither low cholesterol or omega-3 enhanced eggs have proven health benefits over regular eggs.  Lutein enriched eggs are made by feeding the chickens food supplemented with marigold extracts.  Lutein is vital for eye health and diets rich in it have been shown to help with age related vision loss, especially macular degeneration.   Studies have shown that the lutein in lutein enhanced eggs is more bioavailable than lutein from supplements or other sources.   Nutrient enhanced eggs are not necessarily from humanely farmed animals, the label has nothing to do with the conditions in which the chickens are kept.

Vegetarian

The term "vegetarian eggs" may be a bit confusing, but what it comes down to is that the eggs are from vegetarian chickens - that is, chickens that where given no animal byproducts as part of their feed.  Chickens are not natural vegetarians, left to their own devices they will supplement their diet with grubs and worms and insects.  The market for "vegetarian" eggs arose from the Mad Cow disease (transmissible spongiform encephalopathies) scare.  Contraction of TSE is linked to cannibalism and eating infected brain tissue, and at the time of the outbreak many chickens where being fed chicken parts along with their normal soy, corn and grain diets.   A egg labeled vegetarian did not necessarily come from a farm with humane conditions for its chickens.   The easiest way to keep a chicken on a strict vegetarian diet is to place it in a battery cage, perhaps the most inhumane way to raise the animals.  Free-range chicken eggs may be sold as "vegetarian" by farmers who don't provide any animal by products in their feed, even though those chickens are supplementing the provided feed with foraging for bugs.

Organic 

Much like the "vegetarian" label, the "organic" label on eggs is misleading, and for the most part a marketing gimmick.   Typically the only difference between and organic egg and a regular egg is that the chickens were given organic feed, and hasn't been given artificial hormones or other chemicals.  Chickens fed organic food are often still housed in large sheds packed in with a thousand other birds. 

Other Eggs (non-chicken)

Sometimes you can find other kinds of eggs available, more often at farmers-markets than at super-markets.   Duck eggs are bigger than chicken eggs, and very nutritious.  They have a harder shell than chicken-eggs and a longer shelf life if stored properly.  Duck eggs are naturally high in omega-3 fatty acids.  Duck eggs are rumored to be better in baked goods where the higher quantity of albumen in the whites makes cakes and pastries fluffier than when using chicken eggs.  Quail eggs are considered a delicacy in many parts of the world.   They are much smaller than chicken eggs and have spotted shells.  Quail eggs are much more nutritionally dense than chicken eggs.   Many other types of eggs are edible, but most of them aren't typically sold.

Sunday, February 24, 2013

Kale Caesar Salad


Kale Caesar Salad
Caesar salad has been a lifelong food love of mine.  Throughout childhood, I used to request it specially for my birthday dinners.  My mom made it other times of the year too, and it always felt like an occasion.  Creamy, tangy, bite of garlic, and that almost unplaceable saltiness.  Of course, my mother made her dressing from scratch, including garlic croutons, and mixed the dressing right in the bowl, the traditional way.  Many restaurant Caesars have since been a disappointment to me.  

The texture of "dino" kale is our favorite for holding in the caesar dressing.
It never occurred to me to learn how to make Caesar salad until a couple of years ago when one of the city's best food trucks went bricks-and-mortar.  They had a kale Caesar on the menu and I took the gamble.  Though when the menu advertises the use of boquerones and warns about raw eggs, it's probably going to be good.  Using kale as the greens sidestepped my issue with salads generally, which is that lettuce is nutritionally void.  Water and cellulose?  What’s the point?  Anyway, the salad was really good. And I was pretty confident I could recreate it at home.

My interest in Caesar renewed, I acquired my mother’s recipe, and true-to-form, did not follow it.  She steeps crushed garlic in extra virgin olive oil the day before, then brushes it on stale bread to make croutons, but that is simply too much planning for me.  This recipe does not include croutons because of a food sensitivity, and while I think the salad is great without them, they would be great with them too, or with your favorite chopped nuts or seeds.  Whatever you do, do not leave out the anchovies!  The salad won’t end up tasting fishy, but it absolutely won’t be Caesar without those salty little fish.  Anchovies are a relatively cheap and good source of Omega-3 fatty acids, protein, niacin, selenium, iron, calcium, and phosphorous (nutritional info here).  Just in case you want to eat any of those things.
Garlic and anchovy, a match made in salad heaven.
 The key to using raw kale is to give it a good massage as you work in the dressing.  Just squeeze, mash, and rub for about 5 minutes, or until the kale is about a third of the original volume.  You should not squeeze so hard that you are juicing the kale--if you start seeing any green liquid you have gone too far.  Aside from the nutritional advantage, using kale in place of lettuce allows you to dress this salad ahead of time.  Slightly wilted kale does not taste weird or feel slimy, and is actually a little easier to digest.  I have eaten leftover kale Caesar the day after making it and it was still delicious.  Try that with your romaine!  You can use any kind of kale that you like, but I prefer lacinato ("dino") kale because the dressing gets caught in all the little crevices. (Check out different kale varieties)

Kale Caesar Salad

1 bunch kale, ribs removed and torn into pieces
1 clove garlic
1 anchovy fillet
1 tsp. powdered or Dijon mustard
1 egg yolk
1/3 cup fresh grated Parmesan cheese (or to taste)
juice of 1/2 lemon
1/2 cup extra virgin olive oil
fresh ground black pepper, to taste (my taste is to smother it, coarse-grind-style, but your mileage may vary)
Garlic and anchovy paste
 Mash the garlic clove and anchovy fillet together in a mortar and pestle until they form a fine paste.  Put all the ingredients into a large bowl (I usually go in the order listed above), then massage and toss until the kale is reduced in volume and the dressing is well mixed and creamy.  
Ready to get your hands dirty?
Since your hand will be covered in dressing, I probably don’t have to tell you to check the seasoning.  Between the Parmesan and the anchovy, I have never had to add salt, but it’s always good to check the acidity and overall balance.  If it’s overly acidic, a little more oil or Parmesan will balance it out, but be careful not to add too much oil or the dressing will separate.
Massage it!

If you or someone you’re feeding has a sensitive digestive tract that has trouble with raw greens and/or garlic, you can absolutely lightly steam the kale (though massage and a little marination time should yield the same results), and use roasted garlic or garlic-infused olive oil.  Garlic oil is super easy: crush two cloves of garlic in a bowl and pour 1/2 cup extra virgin olive oil over it, cover, and let sit overnight.  If you do try this, let us know it worked out in the comments!
Kale Caesar Salad 
 

Tuesday, February 19, 2013

Pies I've Known

The always beautiful lattice top pie.

Marinated Squid Salad

The fact that squid season coincides with winter is one of the things that makes winter bearable for me.  I freaking love squid.  I'm going to have to level with you guys though, I've never met a kind of seafood I didn't like.  Seriously, I go nuts for the stuff.  I have recently realized that I can't just indiscriminately gobble down anything from the ocean.  Human activities have a huge effect on aquatic ecology and it's important to make informed buying decisions when purchasing seafood.

My favourite resource is Seafood Watch.   They are an awesome group based out of the Monterey Bay Aquarium dedicated to finding a sustainable balance.  Their website says "Scientists estimate that we have removed as much as 90 percent of the large predatory fish such as shark, swordfish and cod from the world's oceans. In 2003, the Pew Oceans Commission warned that the world's oceans are in a state of "silent collapse," threatening our food supply, marine economies, recreation and the natural legacy we leave our children."  Wow, that blows.   But there is something we can do!  I always carry my handy regional pocket guide when going to the fish market.  These guides put out by Seafood Watch, available for download or through an app, show what seafood is the best choice, what are good alternatives, and what should be avoided.  

I'm in luck, here on the west coast squid is on the "good alternatives" list.  Squid is generally considered to be very hard to over fish.  They breed abundantly, have fairly short life cycles (approximately 9 months), and quickly adapt to changes in their environment.    Here on the west coast we had a bumper crop of squid this year, so many that California ended its squid season 4 months early after fishers caught the maximum allowed weight. 

I normally buy my squid pre-cleaned, just because it is less of a hassle.  If you want to go for it with whole ones, cleaning them is a fairly straightforward process.  If you are used to cleaning fish this probably won't gross you out - if you aren't you might want to get the pre-cleaned ones because this is going to be messy.  Instead of explaining the whole process here I am just going to give you guys this link.  Good luck! 

The key to cooking tender delicious squid instead of gummy, bland, rubber band squid is timing.  You either have to cook squid very briefly, for under 2 minutes, or, if you pass that thresh hold and it gets gummy, you have to cook it for over 30 minutes to re-tenderize it.  Some dishes call for a long cooking time, but for the marinated squid salad I made all you have to do is slice the heads and parboil it.   Drop the pieces of squid in boiling water, leaving them in just until they turn opaque, about a minute.   When you take them out of the boiling water, put them immediately into ice-water, or run cold water over them to stop the cooking process.  If you don't do this the squid will keep cooking and very quickly turn into rubber bands.

This recipe is out of the book Fuel Up by dietician and sports nutritionist Georgie Fear and was originally posted on his blog.   Check it out for yourself here.

LinkWithin

Related Posts Plugin for WordPress, Blogger...