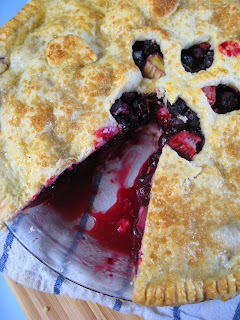
Lauren picked up a flat of blueberries and some rhubarb the other day so I whipped up a pie for her! My deal with my friends is that I will make them a fruit pie any time they want if they show up at my house with the fruit for it. We all love the fresh seasonal produce from the farmers market, and we are getting to the best time of year for fruits. The original plan was to make just a straight blueberry pie, but we were a bit short on berries so we improvised.
Now, I've made quite a few fruit pies at this point but I've never made a blueberry pie. The crust on this was perfect (as usual - I promise I will write you a post dedicated to pie crust next time I make one. It is such a messy process I normally forget to take photos). I did have a few complaints about the filling, but that is just my piefectionism showing through.
Here's the recipe for the filling I used:
- 4 C washed blueberries
- 2 C chopped rhubarb
- 3/4 C sugar
- 2 T tapioca
- zest of one large lemon
- juice of half the lemon
I heard that blueberries have a lot of pectin in them, so I went a bit lighter on the tapioca than my instincts told me to and regretted it. As you can see from the last picture, the filling is oozing out of the pie more than I would like. Flavor-wise this pie was incredible, the berries and the rhubarb went really well together. See that juice in the pie tin up there? I spent like 5 minutes sticking my fingers in it and licking them clean after I took that photo. No joke. All together though it was very tart. I tend to add a lot less sugar to my fruit pies than the average recipe calls for. Next time I will probably add an additional tablespoon of tapioca, and probably up the sugar to a whole cup instead of 3/4s.


